Sew along Step 5
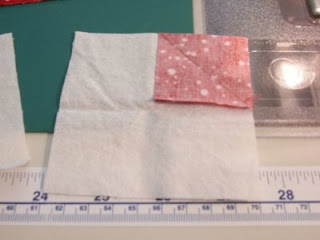
place one red square in the corner of one 3 1/2 inch back ground sq. You are going to sew the diagonal of the red sq from the middle of the background sq to the middle of the background sq. You can either:
1. mark the diagonal with a pencil and sew on that line.
OR

place a piece of tape (I have used blue painters tape in the picture. Is there anything better than blue painters tape? I LOVE the stuff!) Line up the edge of the tape with your needle. Use the edge of the tape as a guide to keep the front point of your fabric straight. See the end of that purple thang (yes that REALLY is the name of that purple gadget you see in the picture! My other fav thing!) If you keep the point on that blue edge, you will have a nice straight seam w/o marking. I use both..just depends on how fussy I want to be! Really, you don't need to mark.

You will do this on the opposite side.

After you have sewn them, you will trim your seam allowance to 1/4. This is what it looks like before ironing. You will need 48 of these squares. Press the seam to the red side. (sorry I forgot to get a picture of this section of the block! I will have to take a close up of the top tomorrow....Could you use your imagination till then? THANKS!)
Update: Here is a picture of the finished section:

sorry it is blurry. I had to block out the rest of the quilt top for you to see
this one area. you will need 48 of these sections.
1. mark the diagonal with a pencil and sew on that line.
OR


place a piece of tape (I have used blue painters tape in the picture. Is there anything better than blue painters tape? I LOVE the stuff!) Line up the edge of the tape with your needle. Use the edge of the tape as a guide to keep the front point of your fabric straight. See the end of that purple thang (yes that REALLY is the name of that purple gadget you see in the picture! My other fav thing!) If you keep the point on that blue edge, you will have a nice straight seam w/o marking. I use both..just depends on how fussy I want to be! Really, you don't need to mark.

You will do this on the opposite side.

After you have sewn them, you will trim your seam allowance to 1/4. This is what it looks like before ironing. You will need 48 of these squares. Press the seam to the red side. (sorry I forgot to get a picture of this section of the block! I will have to take a close up of the top tomorrow....Could you use your imagination till then? THANKS!)
Update: Here is a picture of the finished section:

sorry it is blurry. I had to block out the rest of the quilt top for you to see
this one area. you will need 48 of these sections.

Comments