1st project of the new year


Today I got to sew, but yesterday I used POWER TOOLS! I decided I needed a new ironing board cover. Not the fabric kind..the kind that makes the ironing board(which is meant for CLOTHING) into an ironing board for a quilter. Here are some pictures to get your started on your own. (or you could purchase one...I found it at the Houston quilt show for about $120. Mine was about $20 :::grin:::) I started with a sheet of 1/4 inch MDF. I had it cut at Home Depot...around 24 inches wide by 60 inches long. I think I would either go with a 1/2 in MDF..or maybe not make it quite as long. It is a bit 'flexie" on the ends. Lay it on the floor. Turn the ironing board over on top...center it side to side and on the long ends.

Mark in 5 places along the sides with a pencil. Mark either side of the pointy end, either side of the parallel sides and one on the flat end. Cut "L" molding to fit on those sides. Use 2 screws for each piece. They don't have to go the whole side. (see picture of when they are screwed on.)

Pre drill and then screw each piece of molding. Be careful when choosing screws that they don't poke thru on the other side. Predrill holes doing thru is ok..not pokey ends of the screw- it will poke your fabric as you iron! ARRGGGHHH! Now it is time to cover it. Place fabric good side down with batting on top. I only used one layer of batting (Warm and Natural)..and now wish I had used TWO.

Trim the batting a bit smaller than the cover fabric. Turn the edges under and staple.

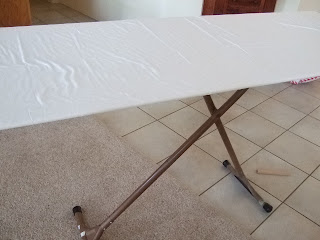
VOILA! Ironing board cover! I have also just done the top...with a removable pad. I have one of these with telescoping legs in my sewing room. I have the ability to iron on the whole table...or just cut. Mostly I cut on one end and iron on the other. It is set up JUST for my height and I rarely get the backache I had when I used the kitchen table. E-mail me if you have any questions..esp if I got the pictures out of order! Happy New Year!

Mark in 5 places along the sides with a pencil. Mark either side of the pointy end, either side of the parallel sides and one on the flat end. Cut "L" molding to fit on those sides. Use 2 screws for each piece. They don't have to go the whole side. (see picture of when they are screwed on.)

Pre drill and then screw each piece of molding. Be careful when choosing screws that they don't poke thru on the other side. Predrill holes doing thru is ok..not pokey ends of the screw- it will poke your fabric as you iron! ARRGGGHHH! Now it is time to cover it. Place fabric good side down with batting on top. I only used one layer of batting (Warm and Natural)..and now wish I had used TWO.

Trim the batting a bit smaller than the cover fabric. Turn the edges under and staple.

VOILA! Ironing board cover! I have also just done the top...with a removable pad. I have one of these with telescoping legs in my sewing room. I have the ability to iron on the whole table...or just cut. Mostly I cut on one end and iron on the other. It is set up JUST for my height and I rarely get the backache I had when I used the kitchen table. E-mail me if you have any questions..esp if I got the pictures out of order! Happy New Year!

Comments
My mom had something like this rigged up and we do use one at our meeting place. One of the quilt husband's rigged one up for us but I didnt want to attach it to the ironing board permanently since we have to store our stuff there.
For home I needed a table where I could press as well as cut and storage underneath for the fabric bins. We covered some plywood with two layers of warm and natural and I got some of that teflon silver cloth at hancock's to cover it. I LOVE it. When I need to cut it is easily removed and no worries about messing up the mat in between.
And I am jealous, not only of you, but it seems like all your commenters have one too.